Contact Us
LTI Optics is always striving to improve customer support and provide you timely product updates and information to increase your productivity. If you have questions about your software, we invite you to review the sections below and check for new product downloads.
You may email support inquiries to us at the follow address: 
Should you need to call us, our support hours are 8 AM - 5 PM MST. Please review the technical support policy. Our technical support staff can be reached at 720-891-0030.
Policy
For
It is beyond the scope of standard technical support to help you with a specific design project.
Overview
Since the job and results files are in a readable XML format, they can also be written and read from custom software tools created by us or yourself. This provides a way to generate, run & view output for Photopia simulations outside of Photopia’s standard CAD interfaces.
Install and Licensing
Install
Licensing
To license a standalone
File Types
PJD Files
All data related to a raytrace job is written to a "Photopia Job Data" (*.PJD) file. This includes all model geometry, lamp data, material data, raytrace & output specifications. Running a PJD file in Queue therefore does not require that the library be installed on the computer.
RRD Files
All results from a raytrace are written to a "Raytrace Results Data" (*.RRD) file. This includes the intensity distributions, recorders & 3D rays. RRD files can be imported into the Photopia CAD plug-ins as well as opened directly in Photopia Reports.
Setup A Raytrace
Fully prepare your CAD model for the raytrace, including all material assignments & output specifications.
SOLIDWORKS
Choose Tools > Photopia > Export job from the SOLIDWORKS menu.
Rhino
Choose Photopia > Export to Queue from the Rhino menu.
Run a Set of PJD Files
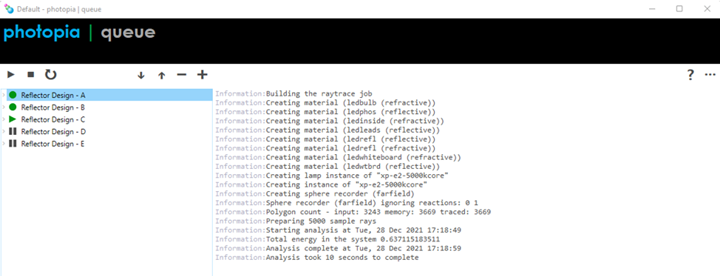
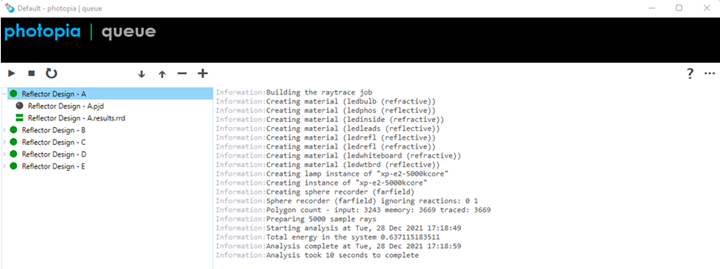
Start Queue from the LTI Optics, LLC Apps folder or pinned icon on your Task Bar. To load PJD files into Queue, drag and drop them into the left pane. You will see a list like shown below. Use the up/down arrows to re-order the jobs in the list. Click the start icon to run the jobs. Clicking on the small icon to the left of the job name will tree out the files associated with that job.

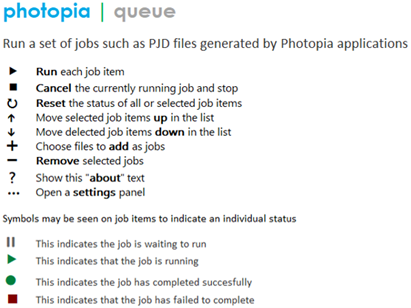
Icons indicate the status of each job as simulations progress through the list.

The following file types will be associated with each job after they have been completed:
Reflector Design - A.pjd

Reflector Design - A.results.log

Reflector Design - A.results.rrd
The log file retains the analysis status data. If you drag a PJD file into Queue after it’s already been run, you will see the results and raytrace status data in Queue.

View Output in photopia | reports
Double click the RRD file in Windows Explorer or on the reference to it in the left pane of Queue to view the output in
View Output in CAD Model
SOLIDWORKS
Choose Tools > Photopia > Import results from the SOLIDWORKS menu.
Rhino
Choose Photopia > Import External Results from the Rhino menu.
Help / About Screen
Clicking the help icon "?" displays descriptions for all interface icons.

Settings Screen
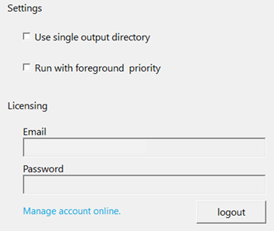
Clicking the … icon opens the Settings screen. Clicking the same icon again closes this screen.

Use single output directory – Queue normally writes results to the same folder as the PJD file. Checking this option will force all output to be written to a single folder when the PJD files are in different folders.
Run with foreground priority – Queue normally runs with a lower process priority. Checking this option will force it to a higher priority. This may affect the responsiveness of other programs on your computer.
Licensing – If you are running Queue on a computer also running Photopia and you’ve already obtained a license with your email and password, then your license will be found by Queue. Otherwise, enter your email and password in this screen. You can run Queue at the same time as Photopia on the same computer, but if you run Queue on a different computer, it will use one of your Photopia licenses.